

Setting Up Your First Node.js Application Step-by-Step
Learn how to install Node.js, use the REPL, run your first script, and create a basic Hello World server.

Introduction
The first step into Node.js should feel exciting.
But for many beginners, it feels confusing instead.
There are new words everywhere:
install Node
check version
use the terminal
try the REPL
run a file
start a server
When all of this comes together at once, the setup can feel more complicated than it really is.
So this article keeps things simple.
We will go step by step and understand how to:
install Node.js
confirm it is working
understand what the REPL is
run your first JavaScript file
create a basic Hello World server
No framework.
No unnecessary tooling.
Just the first clean Node.js setup.
Step 1: Install Node.js
The first thing you need is Node.js itself.
Once Node.js is installed, your system gets access to:
the
nodecommandthe JavaScript runtime
npm in most standard installations
Keep the setup OS-neutral:
download Node.js from the official website
install it like a normal software package
complete the installation process
After that, the terminal should recognize the node command.
Step 2: Check Whether Node.js Is Installed Correctly
Open your terminal and run:
node -v
If installation worked, you should see a version number.
For example:
v22.x.x
You can also check npm:
npm -v
This matters because the terminal is your first connection point with the Node.js runtime.
If the command works, Node.js is ready.
Step 3: Understand What the Node REPL Is
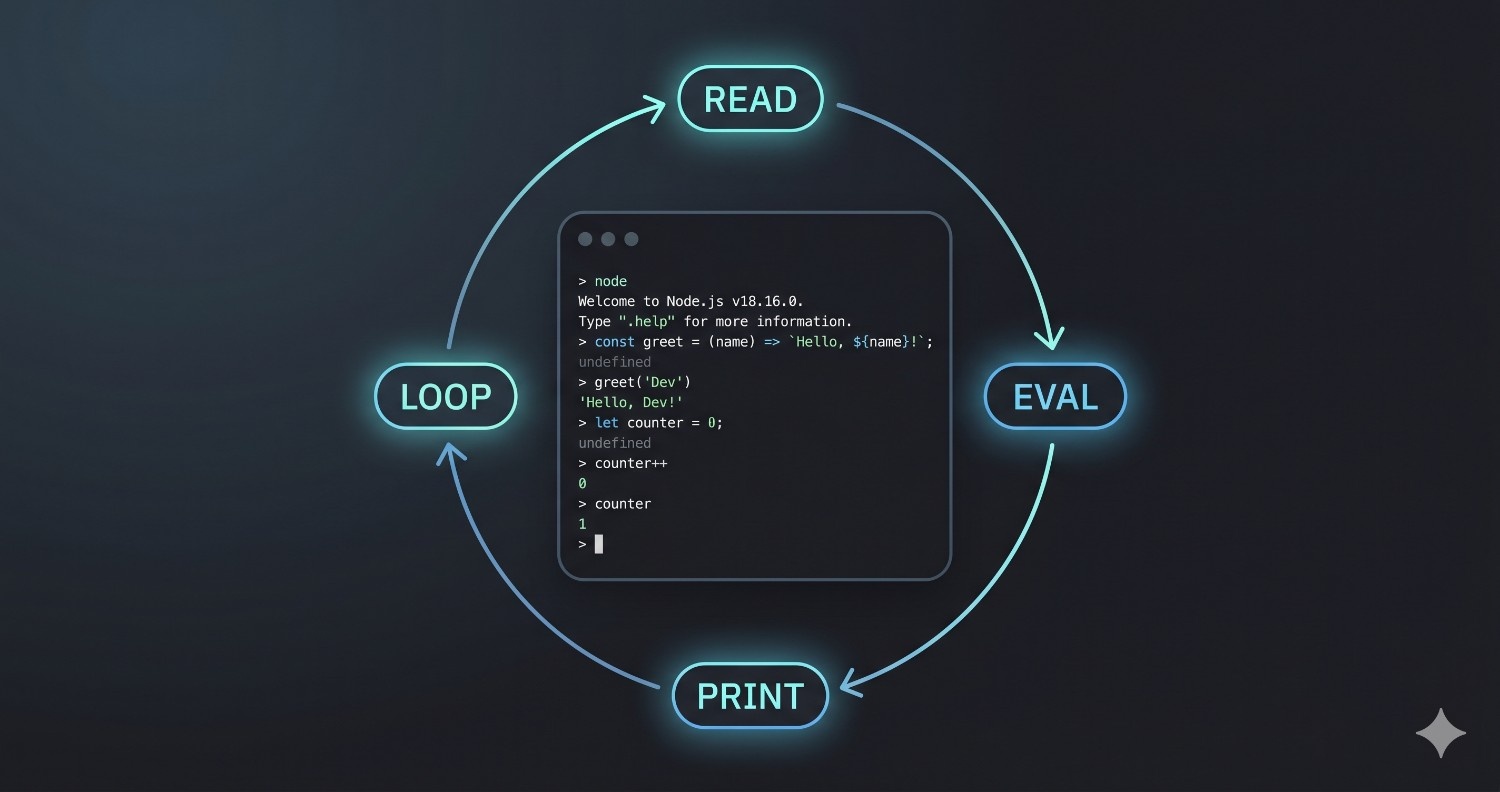
Before writing files, it helps to understand the Node REPL.
REPL stands for:
Read
Eval
Print
Loop
Simple meaning:
it is an interactive environment where you can type JavaScript line by line and see the output immediately.
Start it by running:
node
Now you can type something like:
2 + 3
And Node will respond with:
5
You can also try:
const name = "Prash";
console.log(`Hello ${name}`);
The REPL is useful for:
quick experiments
testing syntax
checking small ideas
It is not where you build full applications.
But it is a great beginner playground.
Step 4: Create Your First JavaScript File
Now move from the REPL to a real file.
Create a file named:
app.js
Inside it, write:
console.log("Hello from Node.js");
This is your first Node.js script.
At this stage, there is no browser involved.
Node reads the file and executes the JavaScript directly in the terminal environment.
Step 5: Run the File Using Node
In the terminal, go to the folder where your file exists and run:
node app.js
Output:
Hello from Node.js
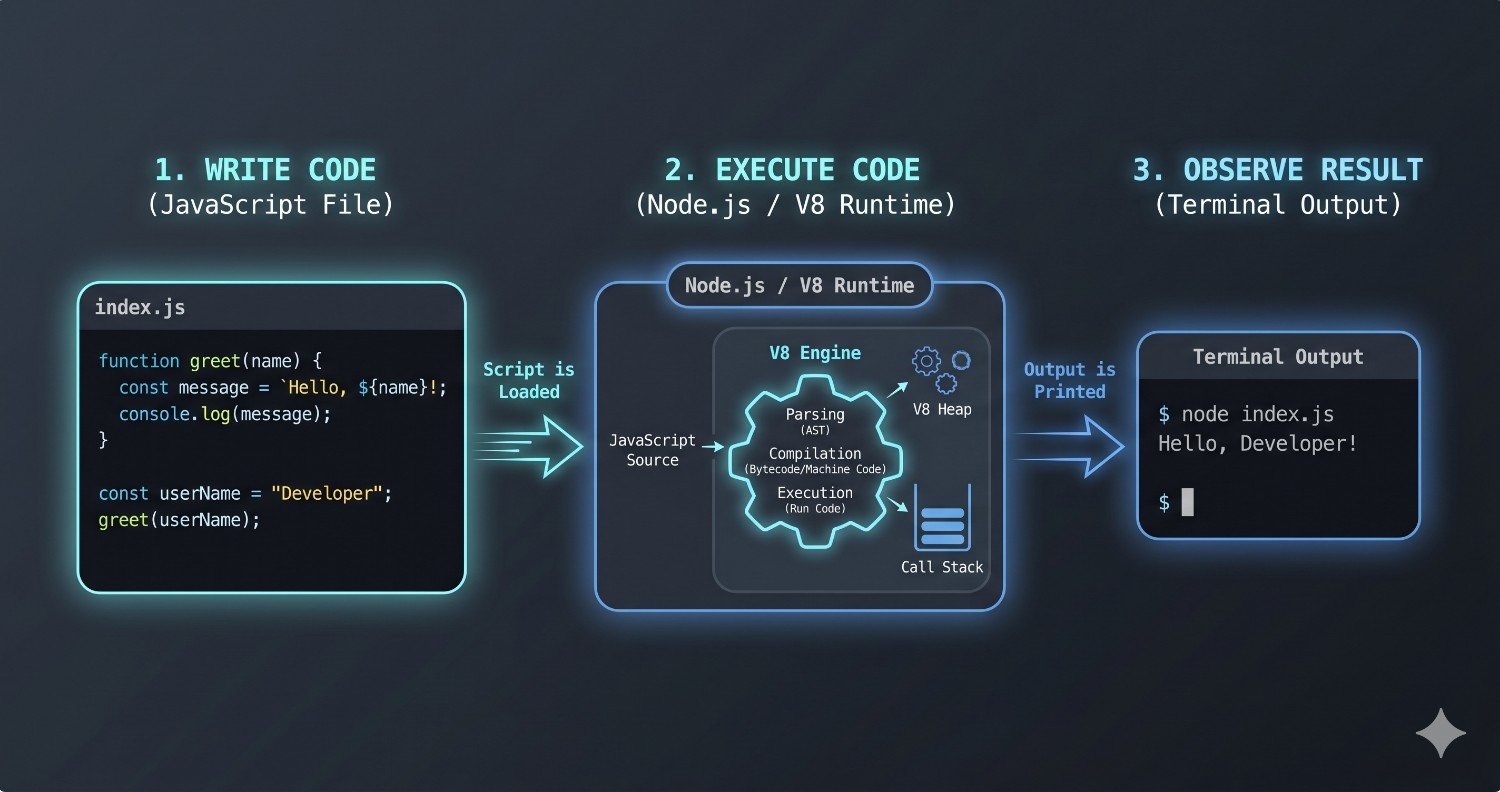
That one command is doing something very important:
Node runtime
-> reads your JavaScript file
-> executes it
-> shows output in the terminal
This is the first real proof that JavaScript is now running outside the browser.
What Just Happened Behind the Scenes?
Even this small example is useful to understand conceptually.
The flow is:
You write JavaScript in a file
-> Node reads the file
-> V8 executes the code
-> output appears in the terminal
At beginner level, this is enough to understand:
browser JavaScript is not the only JavaScript
Node can run your code directly
the terminal becomes part of your development workflow
Step 6: Create a Basic Hello World Server
Now let us take one more step.
Instead of just printing text, let us create a simple server.
Create or update app.js:
const http = require("http");

const server = http.createServer((req, res) => {
  res.writeHead(200, { "Content-Type": "text/plain" });
  res.end("Hello World from Node.js");
});

server.listen(3000, () => {
  console.log("Server is running at http://localhost:3000");
});
Now run:
node app.js
If everything works, the terminal will show:
Server is running at http://localhost:3000
Then open the browser and visit:
http://localhost:3000
You should see:
Hello World from Node.js
This is a huge milestone.
Because now Node is not just running a script.
It is handling a web request and sending a response.
Why This Server Example Matters
This tiny example introduces the core backend idea:
a client sends a request
the server receives it
the server sends a response
That request-response model is the foundation of a lot of backend development.
Even if the example is small, it introduces a very important mindset shift.
You are no longer thinking only about code that changes a page.
You are now thinking about code that can serve the page itself.
REPL vs File vs Server - Keep Them Separate in Your Mind
This distinction helps beginners a lot:
REPL
quick experiments
line-by-line testing
temporary checks
Script File
reusable code
normal program execution
terminal-based output
Server File
waits for incoming requests
responds to clients
forms the beginning of backend development
Once these three ideas are clear, Node.js stops feeling mysterious.
Common Beginner Confusions
Here are a few very normal confusions:
"Why is nothing showing in the browser?"
If you only used console.log, the output goes to the terminal, not the browser page.
"Why does the server keep running?"
Because a server is meant to keep listening for new requests.
"Why do I need the terminal at all?"
Because Node.js is being run by the terminal, not by the browser.
These are small doubts, but clearing them early makes the learning path smoother.
Summary
Node.js installation should be verified from the terminal
the REPL is useful for quick JavaScript experiments
a simple file run with
nodeproves JavaScript is working outside the browsera Hello World server introduces the request-response model
understanding the setup basics makes later backend learning much easier
Final Thought
The best Node.js beginning is not a complex starter template.
It is a clear first setup where you understand what the runtime is doing, what the terminal is doing, and what a server actually means.
That kind of beginning creates much stronger confidence later.


